
Divi, by Elegant Themes is one of the most popular premium WordPress themes that allows a user to design and customize every part a website. The Divi Visual Builder lets you design beautiful websites, without coding. It also comes with pre-made designs that you can easily implement.

The Divi Theme is more than just a theme; it's a design powerhouse that democratizes website creation. Whether you're a business owner looking to establish an online presence or a developer striving for unparalleled customization, Divi empowers you to bring your vision to life, beautifully and efficiently. Dive into the world of Divi, where creativity knows no bounds, and watch as your website transforms into a masterpiece.
Step 1: Log into WordPress and once logged in, go to the page you want to edit and click the Enable Visual Builder icon on the top bar.

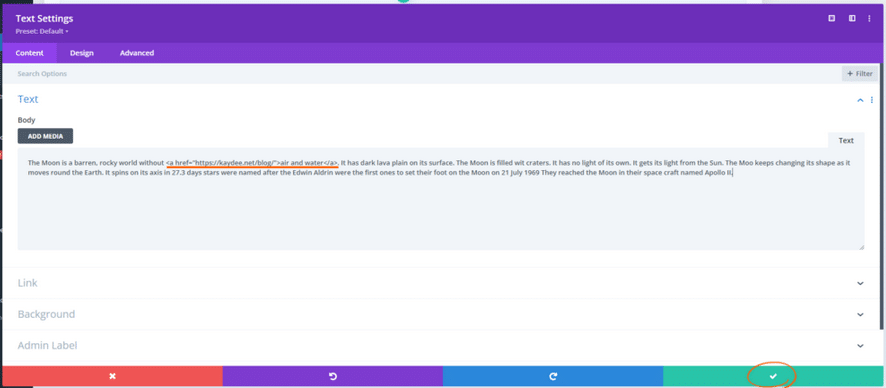
Step 2: For editing text, you can do this by clicking on the edit COG. Formatting changes like text alignment, color, and font can be changed here. The first tab shows the content box, this is where you can change the text directly, under the body box. To save the changes made, click on the purple icon at the bottom of the page, and click save in the bottom right-hand corner. Don’t forget to click update on the WordPress page to save this.
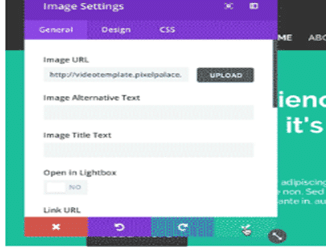
Step 3: To replace images, hover your mouse over and a gray panel should appear with some icons in it. Click on the COG icon and a new panel with settings will open. look for the ‘Image” URL option and to change to another image, click on the upload button. Once done with the changes, click on the green tick, then click save.
Divi is a powerful and complete design framework that allows you to customize and design your website with easy functionality. This can be purchased from the Elegant Themes website. for $89.00 you can access this for a year, and $249.00 for lifetime access. If you are a dev2host customer, we include Divi at no cost.
To know more about Divi Visual Builder, you may visit their site at https://www.elegantthemes.com/gallery/divi/
 Boost Business with Denver Digital Marketing
 Dev2host Email Marketing Services
 WordPress SEO Success with Oxygen Page Builder
 WordPress Web Design, SEO, Hosting and Digital Marketing
 cPanel create Team User Tutorial
 Divi Theme Visual Builder Overview
 Web Design Trends in 2023
 How to keep your website secure
 Cloudflare’s cPanel Plugin to discontinue on November 1st, 2022
 The Client-First Web Design Company
 Web Design Planning
 Top 9 Must-Have WordPress Plugins
 WordPress Website Design Services
 9 Reasons Why Small Business Owners Need Professional Website Services
 Cache Optimization & SEO